VCS Hybrid Cloud Implementation Using Pure Storage on Microsoft Azure

From the “Key Highlights from SNUG 2022“:

“One of the most attractive uses of the cloud for chip development is bursting VCS workloads. “Bursting” to the cloud is all about dynamic deployment of applications and allows customers to leverage the huge scale of compute that the cloud offers. While hosting design data completely on the cloud is simpler and more efficient, many customers want a hybrid scenario where they can store data on a wholly owned storage solution while leveraging Cloud as a Service (CaaS).

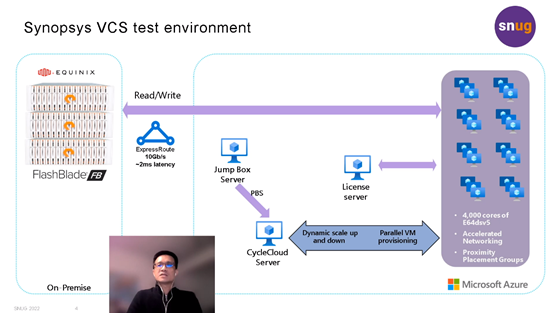
Microsoft Azure has worked with Pure Storage and Equinix to offer such a colocation hybrid solution for customers to gain the desired performance for EDA workloads. On Day 2 of SNUG 2022, Microsoft’s senior program manager, Raymond Meng-Ru Tsai, and Pure Storage’s technical director, Bikash Roy Choudhury, led a joint session to provide attendees with an in-depth perspective of running the industry’s highest performance simulation solution, Synopsys VCS® via Microsoft Azure and Pure Storage FlashBlade® at scale. They discussed best practices to verify parameters such as completion time, storage throughput patterns, and network route capabilities. This discussion also provided attendees with granular details of a tried-and-tested method to store data on a wholly owned FlashBlade device located in an Equinix data center while being connected to the Azure cloud for compute."

microsoft azure cloud storage

Synopsys users will be able to access SNUG content at SolvNetPlus.

Disable Hyper-Threading (HT) on the Azure VM

You will need to create an Azure support ticket, specifying that you would like your subscription to be able to disable Hyper-Threading.

After that, you can disable Hyper-Threading (HT) by adding below tag when you provision the Azure VM. If the VM already exists, you will need to restart the VM to make it effective.

Please add the tag “platformsettings.host_environment.disablehyperthreading” and set it as “true”.

To check if you are running a hyper-threaded VM, run the lscpu command in the Linux VM.

If Thread(s) per core = 1, then hyper-threading has been disabled.

If Thread(s) per core = 2, then hyper-threading has been enabled.

Upgrade Linux Kernel on CentOS 7 and CentOS 8

The default Linux Kernel version of Azure Linux VM is 3.1x for CentOS 7, and 4.1x for CentOS 8.

You can check Linux Kernel version by:

$ uname -r

There are many benefits to upgrade the Linux Kernel, including performance, functionality and security improvement.

For example, mount option “nconnect" is only available on Linux Kernel 5.3 and above. It can spread your server’s networking connections to multiple network interface cards (NICs) to increase total number of TCP connections, and therefore to improve overall IOPS and throughput performance. Which will especially helpful when running HPC and EDA applications.

Performance best practice- running EDA workloads on Azure NetApp Files (microsoft.com)

Below the steps to upgrade the Linux Kernel on CentOS 7:

# Update repository
sudo yum -y update

# Enable the ELRepo Repository
sudo rpm -Uvh http://www.elrepo.org/elrepo-release-7.0-2.el7.elrepo.noarch.rpm

# Install the ELRepo repository。
sudo rpm --import https://www.elrepo.org/RPM-GPG-KEY-elrepo.org
sudo yum -y --enablerepo=elrepo-kernel install kernel-ml

# Reboot the machine
sudo reboot

Below the steps to upgrade the Linux Kernel on CentOS 8:

# Update repository
sudo yum -y update

# Enable the ELRepo Repository
sudo dnf -y install https://www.elrepo.org/elrepo-release-8.el8.elrepo.noarch.rpm

# Install the ELRepo repository。
sudo rpm --import https://www.elrepo.org/RPM-GPG-KEY-elrepo.org
sudo dnf -y --enablerepo=elrepo-kernel install kernel-ml kernel-ml-devel kernel-ml-headers --allowerasing --skip-broken --nobest

# Reboot the machine
sudo reboot

After the reboot, you can check version again:

$ uname -r
5.12.11-1.el8.elrepo.x86_64

Create RAID Array on Azure Windows VM

This article will show you how to create RAID 0 (for best performance), or RAID 1 (for fault tolerance) Array on an Azure Windows VM. And will take HB120v3 as example to stripe its 2 local 960GiB NVMe disks.

  1. Open a command prompt and type “diskpart".

2. At the “DISKPART" prompt, type “list disk" to list all available disks in this VM. In this example we see 2 960GiB disks on Disk 0 and Disk 1.

DISKPART> list disk

  Disk ###  Status         Size     Free     Dyn  Gpt
  --------  -------------  -------  -------  ---  ---
  Disk 0    Online          960 GB      0 B
  Disk 1    Online          960 GB      0 B
  Disk 2    Online            8 GB      0 B
  Disk 3    Online            8 GB      0 B
  Disk 4    Online            8 GB      0 B
  Disk 5    Online          419 GB      0 B

Now repeat below steps 2.1 and 2.2 for every disk you would like to stripe together. That is 0 and 1 in this example.

2.1 Select the disk.

DISKPART> select disk 0

2.2 Convert the selected disk to dynamic.

DISKPART> convert dynamic

3. Create volume array on disk 0 and 1.

DISKPART> create volume stripe disk=0,1

DiskPart successfully created the volume.

4. Check the volume # with Type = “Stripe". Let’s say “5″ as example.

DISKPART> list volume

5. Select the volume and format it.

DISKPART> list volume 5
DISKPART> format quick recommended label="nvme"

6. Assign an available driver letter. Let’s say “d" as example.

DISKPART> assign letter d

Your new volume is ready to use now!

For Linux VM: Create RAID Array on Azure Linux VM – Raymond’s Tech Thoughts

Create RAID Array on Azure Linux VM

This article will show you how to create RAID 0 (for best performance), or RAID 1 (for fault tolerance) Array on an Azure Linux VM. And will take HB120v3 as example to stripe its 2 local 960GiB NVMe disks.

1. Use lsblk command to find the device names.

In HB120v3, you would see 2 NVMe devices: “nvme0n1″ & “nvme1n1″.

2. Create RAID 0 Array.

# Create a logical RAID 0 device named "NVME_RAID". 
# Please change from --level=0 to --level=1" if you would like to create RAID 1 Array
sudo mdadm --create --verbose /dev/md0 --level=0 --name=NVME_RAID --raid-devices=2 /dev/nvme0n1 /dev/nvme1n1
# Create an ext4 file system with label "NVME_RAID"
sudo mkfs.ext4 -L NVME_RAID /dev/md0
# To ensure RAID array is reassembled automatically on boot
sudo mdadm --detail --scan | sudo tee -a /etc/mdadm.conf
# Create a new ramdisk image
sudo dracut -H -f /boot/initramfs-$(uname -r).img $(uname -r)
# Create a mount point
sudo mkdir -p /mnt/raid
# Mount the RAID device
sudo mount LABEL=NVME_RAID /mnt/raid

3. Verify that the 2 NVMe devices have been striped together as an 1.8TiB RAID 0 Array.

[hpcadmin@hb120v3 ~]$ df -h
Filesystem      Size  Used Avail Use% Mounted on
devtmpfs        221G     0  221G   0% /dev
tmpfs           221G     0  221G   0% /dev/shm
tmpfs           221G  9.0M  221G   1% /run
tmpfs           221G     0  221G   0% /sys/fs/cgroup
/dev/sda2        30G   14G   16G  45% /
/dev/sda1       494M  113M  382M  23% /boot
/dev/sda15      495M   12M  484M   3% /boot/efi
/dev/sdb1       473G   73M  449G   1% /mnt/resource
/dev/md0        1.8T   77M  1.7T   1% /mnt/raid
tmpfs            45G     0   45G   0% /run/user/1000

For Windows VM: Create RAID Array on Azure Windows VM – Raymond’s Tech Thoughts

End-to-end HPC deployment automation: AzureHPC

This article will guide you how to automate the process to deploy an HPC environment on Azure, using an open source project AzureHPC.

The environment will look like below:

  1. A Virtual Network named “hpcvnet" and a subnet named “compute".
  2. A Virtual Machine named “headnode":
    • PBS job scheduler
    • 2TB NFS file system
  3. A Virtual Machine Scale Set named “compute", which contains 2 instances.

Prerequisites:

  1. A Linux environment, Windows 10 中的 WSL 2.0 as example with Azure CLI installed。Or you can just use CloudShell of Azure Portal.
  2. An Azure subscription with sufficient quota including:
    • 1xDS8_v3 (8 cores)
    • 2xHC44rs (88 cores)

Step-by-step:

  1. Download AzureHPC repo.
# log in to your Azure subscription
$ az login 

# mkdir your working environment
$ mkdir airlift 
$ cd airlift 

# Clone the AzureHPC repo 
$ git clone https://github.com/Azure/azurehpc.git
$ cd azurehpc 

# Source the install script 
$ source install.sh

There are many HPC templates in the /examples folder. Just change directory to the template folder and edit the config.json file.

2. Edit config.json.

# We will use /examples/simple_hpc_pbs template here
$ cd examples/simple_hpc_pbs 

# edit config.json
# vi config.json 
$ code .

Input values of “location", “resource_group", and “vm_type". You can also change network or storage settings as your desire.

3. Deploy the HPC environment.

$ azhpc-build

It should be completed around 10~15 mins.

4. Connect to “headnode" to check the HPC environment you just deployed.

Please note that /share is mounted, and /apps, /data, and /home directories are exported and accessible from PBS nodes. You can “ssh <PBSNODENAME>" to verify.

$ azhpc-connect -u hpcuser headnode
Fri Jun 28 09:18:04 UTC 2019 : logging in to headnode (via headnode6cfe86.westus2.cloudapp.azure.com)
$ pbsnodes -avS
$ df -h

5. As PBS is well installed and configured on “headnode", you can submit jobs and check jobs status.

$ qstat -Q

6. Delete the environment.

$ azhpc-destroy

Or just delete the whole resource group from Azure portal.

如何在Azure上快速建立HPC環境

高效能運算 High Performance Computing (HPC) 是大數據機器學習、半導體EDA模擬、氣象預報等運算的基礎,一般都是政府單位(如氣象局)或大型企業(如台積電),才有預算採購並建置這種包含數萬核以上的CPU、儲存設備、及高速網路的運算環境。

現在你可以在數十分鐘內,在 Azure 上快速建置出一個大小由您決定的 HPC 環境,作為您實作 POC,以及未來正式將運算上雲之基礎。

本文章會使用 AzureHPC 這個開放原始碼工具來完成一個簡單的 HPC 環境:

  1. 一個名稱為 hpcvnet 的 Virtual Network,其中包含一個名稱為 compute 的 subnet。
  2. 一個名稱為 headnode 的 Virtual Machine,並已安裝:
    • PBS 批次處理系統
    • 2TB 的 NFS 檔案系統
  3. 一個名稱為 compute 的 Virtual Machine Scale Set,其中包含 2 個 instances。

先決條件:

  1. 一個 Linux 環境,例如 Windows 10 中的 WSL 2.0,並安裝 Azure CLI。亦可直接在 Azure Portal 上的 CloudShell 上執行。
  2. 一個有足夠 quota 的 Azure subscription:
    • 1xDS8_v3 (8 cores)
    • 2xHC44rs (88 cores)

步驟:

  1. 下載 AzureHPC repo:
# log in to your Azure subscription
$ az login

# mkdir your working environment
$ mkdir airlift 
$ cd airlift

# Clone the AzureHPC repo 
$ git clone https://github.com/Azure/azurehpc.git
$ cd azurehpc

# Source the install script 
$ source install.sh

這個 AzureHPC repo 包含了許多有已預先建制好的模版,都放在 /examples 目錄之下。

2. 編輯 config.json 檔案:

# 這範例使用 /examples/simple_hpc_pbs 這個模版
$ cd examples/simple_hpc_pbs

# 使用喜歡的編輯器編輯 config.json
# vi config.json 
$ code .

請填寫包含 location, resource_group, 及 vm_type等欄位。 同時請瀏覽一下此設定檔,包含網路及儲存設備等都是在此設定,你可隨需求作更改。

3. 建立 HPC 環境。

$ azhpc-build

大約十分鐘左右可建置完畢。若有錯誤發生,修正後再執行一次即可,程式會自動檢查並跳過已完成的步驟。

4. 登入 headnode,檢查建立好的 HPC 環境。請注意有一個 /share 的目錄,其下的 /apps, /data, /home 三個目錄皆可由 PBS nodes 存取,以存放執行檔及共享資料。

你也可以登入 Azure portal 檢查。

$ azhpc-connect -u hpcuser headnode
Fri Jun 28 09:18:04 UTC 2019 : logging in to headnode (via headnode6cfe86.westus2.cloudapp.azure.com)
$ pbsnodes -avS
$ df -h

5. 利用 PBS submit jobs 並監控執行狀況:

$ qstat -Q

6. 刪除環境:

在 Azure portal 上直接刪除整個資源群祖。

在Azure NetApp Files (ANF)上執行EDA工作之效能調校

微軟的 NFS 解決方案:Azure NetApp Files (ANF) 已被各種行業廣泛採用,包括許多在 Azure 上運行其電子設計自動化 (EDA) 工作負載的半導體公司。

Azure NetApp Files 提供了 3 種不同的服務級別 (Service Level) 以確保吞吐量 (throughput)、提供從 Windows 或 Linux VM 連接的 NFS 3.0/NFS4.1/SMB 的各種掛載協議,操作簡單,只需幾分鐘即可完成設置。企業可以將他們的應用程序無縫遷移到 Azure,並提供類似於本地 NetApps 的體驗和性能。

本文的目的是分享在 Azure NetApp Files 上運行SPEC EDA Benchamrk及FIO等測試所得到的經驗,並:

  • 提供現實世界中實用的性能最佳實踐 (Performance Best Practice)。
  • 利用多個NFS 磁片區 (Volume) 來檢視 ANF 的橫向擴展功能。
  • 成本效益分析,提供使用者選擇最適合 ANF 的服務級別。

Performance best practice- running EDA workloads on Azure NetApp Files (microsoft.com)

在Azure上執行NCBI BLAST

BLAST可以用來比對不同DNA或胺基酸的序列,可以用來追查Covid-19的源頭,或是人類和尼安德塔人的基因相似度。用一般機器跑BLAST通常非常耗時,這篇文章除教導如何在Azure上跑BLAST及其最佳化的過程。

BLAST can be used to compare different DNA or protein sequences, and can be used to trace the origin of Covid-19, or the genetic similarity between humans and Neanderthals. Running BLAST is usually very time-consuming. This article will guide you how to run BLAST on Azure, optimization process, and best practice.

Running NCBI BLAST on Azure – Performance, Scalability and Best Practice (microsoft.com)

機器學習的生命週期作業:Machine Learning Operationalization

這篇文章會帶您透過幾個簡單的指令,快速的將 TensorFlow, CNTK 或是 Python 所建立的預測模型,部署到 Azure Container Service (ACS)HDInsight Spark 上,以達到高擴充性的需求。

AML CLI (Azure Machine Learning Command Line Interface) 是個全新的 Azure 機器學習指令集,目前是 preview 版本,目的在將機器學習的生命週期,例如 Experiment, Model training, Deployment, Management 等.能透過指令自動化流程處理。同時支援 CNTK, TenserFlow 等不同的機器學習框架,未來也將支援如 GPU/FPGA 等機器,協助資料科學家們對模型生命週期的訓練及管理。

GitHub 上有完整範例及文件並隨時更新,已可在 Linux Data Science Virtual Machine (DSVM) 上使用。

環境準備

首先你需要有 Azure 訂用帳戶 (取得訂用帳戶),然後依說明文件建一個 DSVM 出來 (要完成以下練習,只要選擇最便宜的機器即可)。

透過 SSH 連線至 DSVM (可使用 X2Go Putty )後,執行以下指令:

$ wget -q http://amlsamples.blob.core.windows.net/scripts/amlupdate.sh -O – | sudo bash –

$ sudo /opt/microsoft/azureml/initial_setup.sh

注意: 請登出再重新登入以讓改變有效

接下來執行以下指令來設定 AML CLI 環境:

$ az login

$ aml env setup

以上指令會在這個 DSVM 中新增以下這些服務:

  • A resource group
  • A storage account
  • An Azure Container Registry (ACR)
  • An Azure Container Service (ACS)
  • Application insights

注意:

  1. 首先你會被要求到 https://aka.ms/devicelogin 輸入一組代碼,再登入您的 Azure 帳號,確保你有足夠的權限新增服務。
  2. 得輸入小於20個字元、只能包含小寫字母及數字的環境名稱 (Environment names)。

之後你隨時可以執行以下指令來了解所有的環境設定:

$ aml env show

amlenv1

使用 Jupyter

身為資料科學家,您可以使用喜歡的 IDE 來寫作。若使用 Jupyter,在 DSVM 中是跑在 https://<machine-ip-address&gt;:8000 ,請直接以瀏覽器打開並以登入 DSVM 的帳密登入。

在以下資料夾中可分別找到即時及批次服務的範例:

即時: azureml/realtime/realtimewebservices.ipynb notebook

批次: azureml/batch/batchwebservices.ipynb notebook

jupyter1-1

照著步驟即可訓練出一個預測模型:

jupyter2-1

CNTK, TensorFlow 及 Python 範例

利用 AML 部署

若是即時服務 (realtime),會部署到 Azure Container Service (ACS),若是批次服務 (batch) 會部署到 HDInsight Spark,以達成高擴充性及高可用性的目標,無論您的預測模型是由 TensorFlow、CNTK 或 Python 所建制的。

以 realtime 服務範例。SSH到DSVM後,切換到訓練出來的預測模型所在資料夾:

$ cd ~/notebooks/azureml/realtime

接下來執行以下指令,就能部署 realtime service 至所在的 DSVM:

$ aml env local

$ aml service create realtime -f testing.py -m housing.model -s webserviceschema.json -n mytestapp

部署成功後的畫面:

amlenv2

你也可以執行以下指令,部署到 Azure Container Service (ACS) cluster 中:

$ aml env cluster

$ aml service create realtime -f testing.py -m housing.model -s webserviceschema.json -n mytestapp

了解更多 AML CLI 指令

https://github.com/Azure/Machine-Learning-Operationalization/blob/master/aml-cli-reference.md 可看到所有的指令,例如可以執行

$ aml service list

會看到所有已部署的 realtime 或 batch 服務